iOS Setup
Prerequisites
Before you begin, ensure you have:
- Your MovableInk subdomain (e.g.,
mi.yourcompany.com) - AASA file configured by MovableInk at
https://mi.yourcompany.com/.well-known/apple-app-site-association - iOS 13.0 or later as your deployment target
- Xcode 14 or later
Need Help?
If you don't have these prerequisites, see the Getting Started guide or contact your Movable Ink client experience team.
Step 1: Install the SDK
Choose your preferred package manager:
- In Xcode, go to File > Add Package Dependencies
- Enter the repository URL:
https://github.com/movableink/ios-sdk.git - Select version 3.0.0 or later
- Click Add Package
binary "https://raw.githubusercontent.com/movableink/ios-sdk/main/Carthage/MovableInkSDK.json" == 3.0.0In the root of your project, run
$ carthage update --use-xcframeworksAdd to your Podfile:
pod 'MovableInk', '~> 3.0.0'Then run:
pod installDeprecated
CocoaPods is becoming readonly and MovableInk will not be able to update the pod soon. We highly recommend migrating to a different package manager. Read more
- Go to the MovableInk Releases page.
- Download the SDK by opening the Assets accordion and selecting
MovableInk.xcframework.zip - Unzip the file, then drag the
MovableInk.xcframeworkfile into your project under theFrameworks, Libraries, and Embedded Contentsection
Not Native?
We have packages for Flutter, React Native and Expo apps.
Step 2: Configure Universal Links
Add Associated Domains
- Open your project in Xcode
- Select your app target
- Go to Signing & Capabilities tab
- Click + Capability and add Associated Domains
- Add your MovableInk subdomain in the format:
applinks:mi.yourcompany.comReplace yourcompany.com with your actual MovableInk subdomain.
Update Info.plist
Add your MovableInk domain to Info.plist:
<key>movable_ink_universal_link_domains</key>
<array>
    <string>mi.yourcompany.com</string>
</array>
Replace mi.yourcompany.com with your actual MovableInk subdomain (without https://).
Step 3: Initialize and Handle Links
For SwiftUI Apps
In your App file:
import SwiftUI
import MovableInk

@main
struct YourApp: App {
  var body: some Scene {
    WindowGroup {
      ContentView()
        .onContinueUserActivity(NSUserActivityTypeBrowsingWeb) { userActivity in
          guard let url = userActivity.webpageURL else { return }

          MIClient.resolveURL(url) { result in
            switch result {
            case .success(let resolvedURL):
              // Navigate to the resolved URL in your app
              print("Deeplink resolved to: \(resolvedURL)")
              // TODO: Navigate to appropriate screen

            case .failure(let error):
              print("Failed to resolve link: \(error)")
            }
          }
        }
    }
  }
}
For UIKit Apps
In your AppDelegate.swift or SceneDelegate.swift:
import MovableInk

// In AppDelegate.swift
func application(
  _ application: UIApplication,
  continue userActivity: NSUserActivity,
  restorationHandler: @escaping ([UIUserActivityRestoring]?) -> Void
) -> Bool {
  guard userActivity.activityType == NSUserActivityTypeBrowsingWeb, let url = userActivity.webpageURL else {
      return false
  }

  MIClient.resolveURL(url) { result in
    switch result {
    case .success(let resolvedURL):
      // Navigate to the resolved URL in your app
      print("Deeplink resolved to: \(resolvedURL)")
      // TODO: Navigate to appropriate screen

    case .failure(let error):
      print("Failed to resolve link: \(error)")
    }
  }

  return true
}
Step 4: Verify It Works
Build and Run
- Build and run your app on a device or simulator (iOS 13+)
- Make sure your app is in the background or closed
Test with a Sample Link
Ask your MovableInk team for a test deeplink, or use this format:
https://mi.yourcompany.com/p/rp/testWhat to Look For
- Open the test link in Safari on your device/simulator
- Your app should open automatically
- Check the Xcode console for the resolved URL:
Deeplink resolved to: https://yourapp.com/products/123It Works!
If you see the resolved URL in the console, congratulations! Your basic deeplinking integration is working.
Troubleshooting
If your app doesn't open:
- Verify your AASA file is accessible at
https://mi.yourcompany.com/.well-known/apple-app-site-association - Check that your Associated Domains match exactly (no wildcards, no
https://) - Ensure you're testing on iOS 13+
- Try uninstalling and reinstalling your app to refresh the AASA cache
Next Steps
Now that you have basic deeplinking working, you can:
Implement Navigation
Update the TODO in your code to actually navigate to the appropriate screen based on the resolved URL:
case .success(let resolvedURL):
  // Parse the URL and navigate
  if resolvedURL.path.contains("/products/") {
    // Navigate to product detail screen
  }
  else if resolvedURL.path.contains("/categories/") {
    // Navigate to category screen
  }
Add Behavior Events
Capture user interactions to power personalized marketing:
Deployment
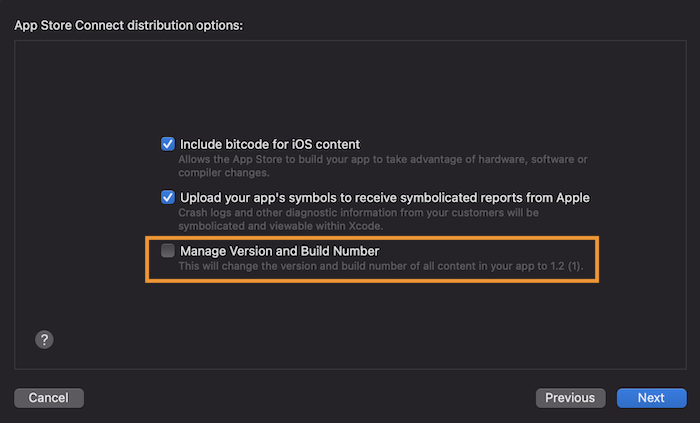
Xcode 13 introduced a new option to their App Store Distribution Option:
Manage Version and Build Number
If checked, this option changes the version and build number of all content of your app to your applications version, including third-party frameworks. This option is enabled by default. Please make sure to disable this option when archiving or exporting your application to the App Store.
If you use the xcodebuild cli to archive your app, you can add the manageAppVersionAndBuildNumber
key to your exportOptions.plist, and set it to false.
xcodebuild -exportArchive -archivePath ./Release.xcarchive \
-exportPath ./Release -exportOptionsPlist ./Release/exportOptions.plist<key>manageAppVersionAndBuildNumber</key>
<false/>If you're using Fastlane with Gym to archive and deploy your app, you can set this key in the export_options hash.
gym(
  scheme: "AppSchemeName",
  workspace: "App.xcworkspace",
  export_method: "app-store",
  export_options: {
    manageAppVersionAndBuildNumber: false
  },
  output_directory: "Builds/"
)
Explore Advanced Features
- Deferred Deeplinking - Handle links for new app installs
- In-App Messages - Display HTML content in your app
- Advanced Features - Custom link handling, clipboard, and more